imlovephoto

บริการถ่ายภาพแต่งงาน Pre-Wedding ถ่ายภาพนอกสถานที่ ถ่ายภาพในสตูดิโอ สามารถเลือกสถานที่ได้ ถ่ายด้วยกล้องดิจิตอล และถ่ายวีดีโอภายในงาน รับถ่ายรูปรับปริญญา รูปงานสำคัญต่างๆ ถ่ายภาพเดี่ยว ครอบครัว แฟชั่น

This is default featured slide 2 title

Go to Blogger edit html and find these sentences.Now replace these sentences with your own descriptions.

This is default featured slide 3 title

Go to Blogger edit html and find these sentences.Now replace these sentences with your own descriptions.

This is default featured slide 4 title

Go to Blogger edit html and find these sentences.Now replace these sentences with your own descriptions.

This is default featured slide 5 title

Go to Blogger edit html and find these sentences.Now replace these sentences with your own descriptions.

สวัสดีครับ ยินดีรับใช้ เนื้อหา สารน่ารู้ เกี่ยวกับเทคโนโลยี

imlovezaa
รายละเอียด
บริการถ่ายภาพแต่งงาน Pre-Wedding ถ่ายภาพนอกสถานที่ ถ่ายภาพในสตูดิโอ สามารถเลือกสถานที่ได้ ถ่ายด้วยกล้องดิจิตอล และถ่ายวีดีโอภายในงาน
รับถ่ายรูปรับปริญญา รูปงานสำคัญต่างๆ ถ่ายภาพเดี่ยว ครอบครัว แฟชั่น

27/5/57

มาเล่น Cacti กัน

เนื่องจากจำไม่ได้ว่าเคยเขียน How to เรื่อง Cacti ไปหรือยังและพยายามค้นดูแล้วหาไม่เจอ ก็เลยเอามาเขียนใหม่อีกรอบครับ Cacti เป็น Performance Monitoring System ตัวหนึ่งที่ใช้งานง่าย เน้นการจับข้อมูลจาก SNMP เป็นหลัก ทำให้การตั้งค่าการใช้งาน Cacti ง่ายตามไปด้วย อีกอย่างมี Plugin เสริมน่าที่สนใจหลายตัว มาลงมือกันเลย

apt-get update

apt-get install snmpd cacti cacti-spine
ตัวติดตั้งเริ่มให้คุณตั้งค่ารหัสผ่านให้กับ MySQL และ Config Cacti :) ง่ายป่าว จากนั้นเรามา config เจ้า SNMP เพิ่มอีกนิดหน่อย แก้ไขที่ไฟล์ /etc/snmp/snmpd.conf แก้ให้ snmpd listen connection on all interfaces

#agentAddress udp:127.0.0.1:161

agentAddress udp:161,udp6:[::1]:161

แก้ไข ACCESS CONTROL uncomment ตรง rocommunity แก้ ip address ให้เป็น ip address ของ Cacti

rocommunity secret Cacti-IP-Address

แก้ไขข้อมูล SYSTEM INFORMATION ให้สื่อความให้สักหน่อย

sysLocation Some Sererver

sysContact some@example.org


จากนั้น restart service ของ snmpd ดังนี้

service snmpd restart

จากนั้นมาตั้งค่า Cacti กัน เปิด browser ไปที่ http://your-cacti-server/cacti ล็อกอินด้วยผู้ใช้ admin รหัสผ่าน admin
- See more at: http://thaiopensource.org/node/5060#sthash.kFi01RLY.dpuf


ที่มา : http://thaiopensource.org/node/5060
เนื่อง จากจำไม่ได้ว่าเคยเขียน How to เรื่อง Cacti ไปหรือยังและพยายามค้นดูแล้วหาไม่เจอ ก็เลยเอามาเขียนใหม่อีกรอบครับ Cacti เป็น Performance Monitoring System ตัวหนึ่งที่ใช้งานง่าย เน้นการจับข้อมูลจาก SNMP เป็นหลัก ทำให้การตั้งค่าการใช้งาน Cacti ง่ายตามไปด้วย อีกอย่างมี Plugin เสริมน่าที่สนใจหลายตัว มาลงมือกันเลย
apt-get update
apt-get install snmpd cacti cacti-spine
ตัวติดตั้งเริ่มให้คุณตั้งค่ารหัสผ่านให้กับ MySQL และ Config Cacti :) ง่ายป่าว จากนั้นเรามา config เจ้า SNMP เพิ่มอีกนิดหน่อย แก้ไขที่ไฟล์ /etc/snmp/snmpd.conf แก้ให้ snmpd listen connection on all interfaces
#agentAddress udp:127.0.0.1:161
agentAddress udp:161,udp6:[::1]:161
แก้ไข ACCESS CONTROL uncomment ตรง rocommunity แก้ ip address ให้เป็น ip address ของ Cacti
rocommunity secret Cacti-IP-Address
แก้ไขข้อมูล SYSTEM INFORMATION ให้สื่อความให้สักหน่อย
sysLocation Some Sererver
sysContact some@example.org
จากนั้น restart service ของ snmpd ดังนี้
service snmpd restart
จากนั้นมาตั้งค่า Cacti กัน เปิด browser ไปที่ http://your-cacti-server/cacti ล็อกอินด้วยผู้ใช้ admin รหัสผ่าน admin

จากนั้นโปรแกรมจะให้ตั้งรหัสผ่านใหม่

เมื่อตั้งรหัสผ่านเสร็จก็จะเข้าหน้า Cacti โล่งๆ แบบนี้

เปิดหน้า setting ที่ Configuration > Settings ตั้งค่า SNMP Version เป็น 2 และ SNMP Community เป็น secret

คลิกไปที่ Tab Poller เลือก Poller Type เป็น spine กำหนด Poller Inteval เป็น Every Minute กด Save

เพิ่ม Host ของเราเข้าไป ไปที่ Management > Devices กด Add ใส่ข้อมูล ระบุชื่อ hostname หรือ ip address เลือก Template เป็น Local Linux Machine กด Save

เพิ่ม Template เพิ่มเติม Unix - Ping Latency, SNMP - Get Mounted Partitions, SNMP - Get Processor Information, SNMP - Interface Statistics กด Save

กด Create Graphs for this Host เลือกกราฟทั้งหมด กด Create

นั่งรอไปสักพัก เลือก Tab Graphs ก็จะพบกราฟที่ดึงมาจาก SNMP สวยงาม :)
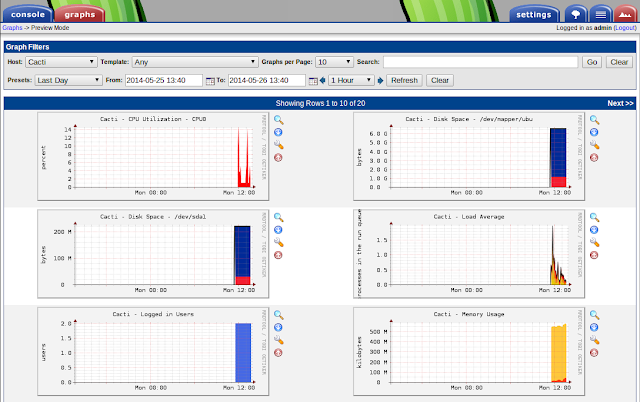
ถ้าต้องการทำ report โดยเลือกเฉพาะบางกราฟ ให้ไปที่ Console > Management > Graph Trees เลือกสร้างรายงานที่คุณต้องการได้ ;)
- See more at: http://thaiopensource.org/node/5060#sthash.kFi01RLY.dpuf
เนื่อง จากจำไม่ได้ว่าเคยเขียน How to เรื่อง Cacti ไปหรือยังและพยายามค้นดูแล้วหาไม่เจอ ก็เลยเอามาเขียนใหม่อีกรอบครับ Cacti เป็น Performance Monitoring System ตัวหนึ่งที่ใช้งานง่าย เน้นการจับข้อมูลจาก SNMP เป็นหลัก ทำให้การตั้งค่าการใช้งาน Cacti ง่ายตามไปด้วย อีกอย่างมี Plugin เสริมน่าที่สนใจหลายตัว มาลงมือกันเลย
apt-get update
apt-get install snmpd cacti cacti-spine
ตัวติดตั้งเริ่มให้คุณตั้งค่ารหัสผ่านให้กับ MySQL และ Config Cacti :) ง่ายป่าว จากนั้นเรามา config เจ้า SNMP เพิ่มอีกนิดหน่อย แก้ไขที่ไฟล์ /etc/snmp/snmpd.conf แก้ให้ snmpd listen connection on all interfaces
#agentAddress udp:127.0.0.1:161
agentAddress udp:161,udp6:[::1]:161
แก้ไข ACCESS CONTROL uncomment ตรง rocommunity แก้ ip address ให้เป็น ip address ของ Cacti
rocommunity secret Cacti-IP-Address
แก้ไขข้อมูล SYSTEM INFORMATION ให้สื่อความให้สักหน่อย
sysLocation Some Sererver
sysContact some@example.org
จากนั้น restart service ของ snmpd ดังนี้
service snmpd restart
จากนั้นมาตั้งค่า Cacti กัน เปิด browser ไปที่ http://your-cacti-server/cacti ล็อกอินด้วยผู้ใช้ admin รหัสผ่าน admin

จากนั้นโปรแกรมจะให้ตั้งรหัสผ่านใหม่

เมื่อตั้งรหัสผ่านเสร็จก็จะเข้าหน้า Cacti โล่งๆ แบบนี้

เปิดหน้า setting ที่ Configuration > Settings ตั้งค่า SNMP Version เป็น 2 และ SNMP Community เป็น secret

คลิกไปที่ Tab Poller เลือก Poller Type เป็น spine กำหนด Poller Inteval เป็น Every Minute กด Save

เพิ่ม Host ของเราเข้าไป ไปที่ Management > Devices กด Add ใส่ข้อมูล ระบุชื่อ hostname หรือ ip address เลือก Template เป็น Local Linux Machine กด Save

เพิ่ม Template เพิ่มเติม Unix - Ping Latency, SNMP - Get Mounted Partitions, SNMP - Get Processor Information, SNMP - Interface Statistics กด Save

กด Create Graphs for this Host เลือกกราฟทั้งหมด กด Create

นั่งรอไปสักพัก เลือก Tab Graphs ก็จะพบกราฟที่ดึงมาจาก SNMP สวยงาม :)

ถ้าต้องการทำ report โดยเลือกเฉพาะบางกราฟ ให้ไปที่ Console > Management > Graph Trees เลือกสร้างรายงานที่คุณต้องการได้ ;)
- See more at: http://thaiopensource.org/node/5060#sthash.kFi01RLY.dpuf

16/2/57

ZPanel ระบบคอนโทรลพาเนลฟรีสำหรับควบคุม Web Hosting องค์กร
ทูลตัวนี้ความสามารถไม่แพ้ฝั่งคอมเมอร์เชียวอย่าง CPanel, Direct Admin เลยทีเดียว เหมาะสำหรับติดตั้งบริการ Linux Server ในองค์กร (visit website > http://www.zpanelcp.com/)


** แล้ว ZPanel ดีอย่างไร
- สามารถติดตั้งใช้งานได้ทั้ง Linux (CentOS, Ubuntu), BSD (FreeBSD),Mac OSX และ Windows Server
- แยกส่วนการควบคุมเป็น 3 ส่วนคือ Admin, Reseller, Customer
- ใช้เวลาติดตั้งประมาณ 15-20 นาทีเท่านั้น
- พัฒนาแอพหลังบ้านด้วยภาษา PHP
- ความสามารถคล้ายๆ ISPConfig แต่หน้าตาสวยกว่า

** ความต้องการกรณีใช้ Linux / FreeBSD
- Apache Web Server
- Postfix MTA
- Dovecot IMAP/POP3
- ProFTP Daemon
- MySQL
- PHP
- Webalizer
- RoundCube
- phpMyAdmin
- phpSysInfo

**ความต้องการกรณีใช้ Windows
- Apache Web Server
- hMailServer
- FileZilla Server
- MySQL
- PHP
- Webalizer
- RoundCube
- phpSysInfo

Install for CentOs

Install ZPanel 10.1.0 to CentOS 64bit:

1) Log to your server as root user:
sudo -i
2) Ensure you are in your home directory:
cd
3) download the installer
wget -O installer-10-1-0-centos-64.sh.x https://github.com/zpanel/zpanelx/releases/download/10.1.0_orig/installer-10-1-0-centos-64.sh.x
If wget error, install wget:  yum install wget then redo wget and continue with install.
4) Make the installer executable
chmod +x installer-10-1-0-centos-64.sh.x
5) Install pre-required packages
yum install ld-linux.so.2 curl
6) Run the installer
./installer-10-1-0-centos-64.sh.x
7) Follow the on screen instructions during the installation.
(See also About Installer questions)
8) Return to user lever
exit


ZPanel ระบบคอนโทรลพาเนลฟรีสำหรับควบคุม Web Hosting องค์กร
ทูลตัวนี้ความสามารถไม่แพ้ฝั่งคอมเมอร์เชียวอย่าง CPanel, Direct Admin เลยทีเดียว เหมาะสำหรับติดตั้งบริการ Linux Server ในองค์กร (visit website > http://www.zpanelcp.com/)
** แล้ว ZPanel ดีอย่างไร
- สามารถติดตั้งใช้งานได้ทั้ง Linux (CentOS, Ubuntu), BSD (FreeBSD),Mac OSX และ Windows Server
- แยกส่วนการควบคุมเป็น 3 ส่วนคือ Admin, Reseller, Customer
- ใช้เวลาติดตั้งประมาณ 15-20 นาทีเท่านั้น
- พัฒนาแอพหลังบ้านด้วยภาษา PHP
- ความสามารถคล้ายๆ ISPConfig แต่หน้าตาสวยกว่า
** ความต้องการกรณีใช้ Linux / FreeBSD
- Apache Web Server
- Postfix MTA
- Dovecot IMAP/POP3
- ProFTP Daemon
- MySQL
- PHP
- Webalizer
- RoundCube
- phpMyAdmin
- phpSysInfo
**ความต้องการกรณีใช้ Windows
- Apache Web Server
- hMailServer
- FileZilla Server
- MySQL
- PHP
- Webalizer
- RoundCube
- phpSysInfo
- See more at: http://www.arnut.com/bb/node/247#sthash.r7fFYRvA.dpuf

ZPanel ระบบคอนโทรลพาเนลฟรีสำหรับควบคุม Web Hosting องค์กร

ZPanel ระบบคอนโทรลพาเนลฟรีสำหรับควบคุม Web Hosting องค์กร
ทูลตัวนี้ความสามารถไม่แพ้ฝั่งคอมเมอร์เชียวอย่าง CPanel, Direct Admin เลยทีเดียว เหมาะสำหรับติดตั้งบริการ Linux Server ในองค์กร (visit website > http://www.zpanelcp.com/)
** แล้ว ZPanel ดีอย่างไร
- สามารถติดตั้งใช้งานได้ทั้ง Linux (CentOS, Ubuntu), BSD (FreeBSD),Mac OSX และ Windows Server
- แยกส่วนการควบคุมเป็น 3 ส่วนคือ Admin, Reseller, Customer
- ใช้เวลาติดตั้งประมาณ 15-20 นาทีเท่านั้น
- พัฒนาแอพหลังบ้านด้วยภาษา PHP
- ความสามารถคล้ายๆ ISPConfig แต่หน้าตาสวยกว่า
** ความต้องการกรณีใช้ Linux / FreeBSD
- Apache Web Server
- Postfix MTA
- Dovecot IMAP/POP3
- ProFTP Daemon
- MySQL
- PHP
- Webalizer
- RoundCube
- phpMyAdmin
- phpSysInfo
**ความต้องการกรณีใช้ Windows
- Apache Web Server
- hMailServer
- FileZilla Server
- MySQL
- PHP
- Webalizer
- RoundCube
- phpSysInfo
- See more at: http://www.arnut.com/bb/node/247#sthash.r7fFYRvA.dpuf

ZPanel ระบบคอนโทรลพาเนลฟรีสำหรับควบคุม Web Hosting องค์กร

ZPanel ระบบคอนโทรลพาเนลฟรีสำหรับควบคุม Web Hosting องค์กร
ทูลตัวนี้ความสามารถไม่แพ้ฝั่งคอมเมอร์เชียวอย่าง CPanel, Direct Admin เลยทีเดียว เหมาะสำหรับติดตั้งบริการ Linux Server ในองค์กร (visit website > http://www.zpanelcp.com/)
** แล้ว ZPanel ดีอย่างไร
- สามารถติดตั้งใช้งานได้ทั้ง Linux (CentOS, Ubuntu), BSD (FreeBSD),Mac OSX และ Windows Server
- แยกส่วนการควบคุมเป็น 3 ส่วนคือ Admin, Reseller, Customer
- ใช้เวลาติดตั้งประมาณ 15-20 นาทีเท่านั้น
- พัฒนาแอพหลังบ้านด้วยภาษา PHP
- ความสามารถคล้ายๆ ISPConfig แต่หน้าตาสวยกว่า
** ความต้องการกรณีใช้ Linux / FreeBSD
- Apache Web Server
- Postfix MTA
- Dovecot IMAP/POP3
- ProFTP Daemon
- MySQL
- PHP
- Webalizer
- RoundCube
- phpMyAdmin
- phpSysInfo
**ความต้องการกรณีใช้ Windows
- Apache Web Server
- hMailServer
- FileZilla Server
- MySQL
- PHP
- Webalizer
- RoundCube
- phpSysInfo
- See more at: http://www.arnut.com/bb/node/247#sthash.r7fFYRvA.dpuf
ZPanel ระบบคอนโทรลพาเนลฟรีสำหรับควบคุม Web Hosting องค์กร

ZPanel ระบบคอนโทรลพาเนลฟรีสำหรับควบคุม Web Hosting องค์กร
ทูลตัวนี้ความสามารถไม่แพ้ฝั่งคอมเมอร์เชียวอย่าง CPanel, Direct Admin เลยทีเดียว เหมาะสำหรับติดตั้งบริการ Linux Server ในองค์กร (visit website > http://www.zpanelcp.com/)
** แล้ว ZPanel ดีอย่างไร
- สามารถติดตั้งใช้งานได้ทั้ง Linux (CentOS, Ubuntu), BSD (FreeBSD),Mac OSX และ Windows Server
- แยกส่วนการควบคุมเป็น 3 ส่วนคือ Admin, Reseller, Customer
- ใช้เวลาติดตั้งประมาณ 15-20 นาทีเท่านั้น
- พัฒนาแอพหลังบ้านด้วยภาษา PHP
- ความสามารถคล้ายๆ ISPConfig แต่หน้าตาสวยกว่า
** ความต้องการกรณีใช้ Linux / FreeBSD
- Apache Web Server
- Postfix MTA
- Dovecot IMAP/POP3
- ProFTP Daemon
- MySQL
- PHP
- Webalizer
- RoundCube
- phpMyAdmin
- phpSysInfo
**ความต้องการกรณีใช้ Windows
- Apache Web Server
- hMailServer
- FileZilla Server
- MySQL
- PHP
- Webalizer
- RoundCube
- phpSysInfo
- See more at: http://www.arnut.com/bb/node/247#sthash.r7fFYRvA.dpuf

ZPanel ระบบคอนโทรลพาเนลฟรีสำหรับควบคุม Web Hosting องค์กร

ZPanel ระบบคอนโทรลพาเนลฟรีสำหรับควบคุม Web Hosting องค์กร
ทูลตัวนี้ความสามารถไม่แพ้ฝั่งคอมเมอร์เชียวอย่าง CPanel, Direct Admin เลยทีเดียว เหมาะสำหรับติดตั้งบริการ Linux Server ในองค์กร (visit website > http://www.zpanelcp.com/)
** แล้ว ZPanel ดีอย่างไร
- สามารถติดตั้งใช้งานได้ทั้ง Linux (CentOS, Ubuntu), BSD (FreeBSD),Mac OSX และ Windows Server
- แยกส่วนการควบคุมเป็น 3 ส่วนคือ Admin, Reseller, Customer
- ใช้เวลาติดตั้งประมาณ 15-20 นาทีเท่านั้น
- พัฒนาแอพหลังบ้านด้วยภาษา PHP
- ความสามารถคล้ายๆ ISPConfig แต่หน้าตาสวยกว่า
** ความต้องการกรณีใช้ Linux / FreeBSD
- Apache Web Server
- Postfix MTA
- Dovecot IMAP/POP3
- ProFTP Daemon
- MySQL
- PHP
- Webalizer
- RoundCube
- phpMyAdmin
- phpSysInfo
**ความต้องการกรณีใช้ Windows
- Apache Web Server
- hMailServer
- FileZilla Server
- MySQL
- PHP
- Webalizer
- RoundCube
- phpSysInfo
- See more at: http://www.arnut.com/bb/node/247#sthash.r7fFYRvA.dpuf

10/11/56

เปิดโหมดบันทึกแท็บการใช้งาน Firefox 4.x.x ให้เหมือนเวอร์ชั่นก่อนหน้า

สำหรับท่านที่เคยใช้ Firefox รุ่นก่อนหน้า หากมีความต้องการที่จะปิดหน้าต่างโปรแกรม มักจะคุ้นเคยกับคำถามนี้กันดี “Do you want Firefox to save your tabs for the next time it starts?” เพื่อให้ Firefox มีการบันทึกแท็บการใช้งานเอาไว้สำหรับการเปิดใช้งานห น้าต่างในครั้งต่อไป แต่เมื่อมีการอัพเดตเว็บเบราเซอร์เป็นเวอร์ชั่นใหม่อ ย่างเวอร์ชั่น 4.0 ฟีเจอร์นี้ก็จะเปลี่ยนรูปแบบไปเป็นการปิดหน้าต่างที่ เคยใช้งานไปเลย แบบว่าไม่ต้องมีการบันทึกการใช้งานครั้งล่าสุดเอาไว้ ดังนั้น ถ้าหากเราอยากได้แท็บหน้าต่างแบบเก่าที่เคยมีในเวอร์ ชั่น 3.x.x กลับคืนมา ก็สามารถแก้ไขผ่านทางคำสั่ง about:config ในตัวโปรแกรมเบราเซอร์ตัวนี้ได้ง่ายๆเลยครับ
                                    หน้าต่างยืนยันการปิดการทำงานแบบใหม่


หน้าต่างยืนยันการบันทึกการใช้งานแบบเก่า


 โดยเปิดหน้าต่างเบราเซอร์ Firefox ขึ้นมา แล้วพิมพ์คำสั่ง about:config ลงในช่องแอดเดรสบาร์ -> Enter 1 ครั้ง
ในช่อง Filter: ให้พิมพ์คำสั่ง browser.showQuitWarning
พร้อมกับดับเบิ้ลคลิกที่คำสั่งดังรูป เพื่อเปลี่ยนค่าจาก False ให้เป็น Trueก็เป็นอันเรียบร้อยแล้วครับ


8/11/56

Audacity : โปรแกรมตัดต่อเสียง


มาถึงคราวโปรแกรมทดแทนด้านตัดต่อเสียงบ้างนะครับ อันนี้หลายๆคนอาจจะไม่ค่อยคุ้น เพราะโปรแกรมตัดต่อเสียงส่วนใหญ่จะใช้เฉพาะกันในวงแคบๆเช่น Cool Edit , Adobe Audition , Goldwave , SoundForge ซึ่งบางคนลงโปรแกรมแพงๆเหล่านั้น เพียงเพื่อที่ว่า ต้องการตัดเสียงนิดหน่อย หรือ ทำริงโทนเท่านั้นเองไม่ได้ใช้โปรแกรมเหล่านั้นอย่างเต็มประสิทธิภาพเลย วันนี้ผมจึงขอนำเสนอโปรแกรมตัดต่อเสียงแบบไม่ผิดลิขสิืทธิ์ที่ชื่อว่า “Audacity” ครับ


โปรแกรม Audacity (ชื่อเหมือน Honda City วุ้ย) เป็นฝีมือของ Dominic Mazzoni และ Roger Dannerberg สองนึกศึกษาแห่งมหาวิทยาลัย คาร์เนกี้ เมลลอล คิดค้นกันเมื่อปี 1999 และในปี 2000 ก็กลายเป็น Project ใน Sourgeforge.net ศูนย์รวมของนักพัฒนา OpenSource ระดับโลก จนตอนนี้ ทีมงานพัฒนาจากแค่สองคนกลายมาเป็น 30 กว่าคนแล้ว
ความสามารถของ Audacity ก็คือ
  • อัดจาก Microphone / Line in หรือแหล่งเสียงอื่นๆ
  • Dub เสียงไปบน Track เดิมเพื่อสร้างการอัดแบบ Multi Track
  • อันเสียง 16 Channel ได้พร้อมกัน (แต่ต้องหา Hardware อัดเสียง 16 Channel มารองรับด้วย)
  • ปรับ Level Meter ระหว่าง อัด หรือก่อนและหลังอัดเสียงก็ได้
  • รองรับไฟล์ต่อไปนี้ WAV / AIFF / AU / Ogg Vorbis / MP3 (ต้องใช้ Plugin เสริม) / และไฟล์ RAW ได้
  • สามารถ Cut / Copy / Paste / Delete ห้วงเสียงได้ทุกรูปแบบ
  • ทำ Undo / Redo กี่ครั้งก็ได้
  • ตัดต่อไฟล์ใหญ่ๆได้อย่างรวดเร็ว
  • ตัดต่อและ Mix เสียงกี่ Track ก็ได้
  • Fade เสียงเข้าหรืออกแบบนุ่มๆก็ทำได้
  • เปลี่ยนค่า Pitch ของเสียง โดยไม่กระทบต่อจังหวะ (และเปลี่ยนจังหวะโดยไม่กระทบต่อ Pitch เช่นเดียวกัน)
  • ลบเสียงบรรยากาศ เช่นพวกเสียง hiss / hum และอื่นๆได้
  • ปรับแต่งเสียงด้วย Equalizer ได้
  • มี Effect 4 แบบให้เลือกใช้ ได้แก่ Echo / Phraser / WahWah / Reverse และหาดา่วน์โหลด effect มาใส่เพิ่มได้
  • อัดเสียงได้บนระบบ 16 / 24 / 32 bit
  • ความถี่ที่อัดได้สูงสุดที่ 96 Khz
โอ๊ย ความสามารถเยอะแบบนี้ แถมโหลด Plugin เสริมได้อีกเพียบ จึงทำให้ได้รางวัล โปรแกรมยอดเยี่ยมด้านตัดต่อเสียงมาครอง แถมยังสามารถใช้ได้ทั้ง Windows / Mac / Linux อีกด้วย สุดยอดมากๆคร้าบ

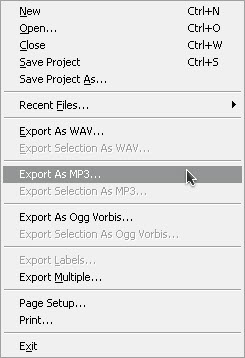
อ้อ แต่มีข้อแม้นิดนึงก็คือ การจะ Export MP3 นั่น คุณจะต้องใช้ Plugin ที่ชื่อ LAME ซึ่งสามารถดาวน์โหลด ได้ที่นี่ ครับ ตอนนี้ถ้าใครอยากได้ โปรแกรมตัด ริงโทน แบบง่ายๆ ผมแนะนำ Audacity นี่แหละครับ เปิดไฟล์มา ตัดแค่ท่อนที่ชอบ จากนั้นทำ Fade in/out ซะหน่อย แล้วก็ Export มาเป็น MP3 แค่นี้ก็ได้ริงโทนเก๋ๆแล้วครับ
โปรแกรม Audacity เป็นของฟรีไม่มีขาย แต่ถ้าอยา่กช่วยเหลือนักพัฒนา ก็ลองไปเลือกช็อปปิ้งใน Audacity Store ได้นะครับ มีที้งเสื้อและอุปกรณ์ในการช่วยทำงานด้านตัดต่อขายเพียบครับ
รายละเอียดโปรแกรม
ชื่อ : Audacity
โดย : ทีมงาน Audacity
ขนาด : 18Mb
ดาวน์โหลด : http://audacity.sourceforge.net/

WinSCP (โปรแกรม FTP SFTP โปรแกรมรับส่งไฟล์ ผ่าน โปรแกรม Putty)


โปรแกรม WinSCP เอาไว้เชื่อมต่อข้อมูล สามารถใช้ รับส่งไฟล์ ระหว่างเครื่องในโปรโตคอล SFTP FTP หรือ SCP ที่รวมเอาคุณสมบัติของโปรแกรม Putty เอาไว้ แจกฟรี แน่นอน


ตัวอย่างโปรแกรม 


ดาว์โหลดโปรแกรม คลิก

CISCO Speed Meter Pro โปรแกรมทดสอบความเร็วเน็ตว่าแรงแค่ไหน ?

CISCO Speed Meter Pro v1.3.9052 โปรแกรมทดสอบความเร็วเน็ต และตรวจวัดระดับความเร็วในวงแลนและการเชื่อมต่อ internet โดยจำลองเป็นภาพให้เห็นโครงสร้างแบบชัดเจนในเครือข่าย พร้อม Patch


ตัวอย่าง


ดาว์โหลดไฟล์ คลิก

4/11/56

SNMP Installation

SNMP Installation

Windows 2008 SNMP Installation

  • Click the Start button windows-start-button-2003-2008.gif
  • Select "Control Panel"
  • Select "Programs and Features"
  • Click on "Turn Windows features on or off":
    programs-and-features-2008.gif
  • In the "Server Manager" window, click the link "Add Features": ":
    server-manager.gif
  • Check the option for "Simple Network Management Protocol (SNMP)":
    select-features-2008.gif
  • Click Next
  • On the "Confirm Installation Selections" screen, click "Install"
  • Upon successful installation, click the "Close" button.
  • The SNMP Service will start automatically: Includes agents that monitor the activity in network devices and report to the network console workstation.
  • Continue with the Configuration Section


Windows 2003 SNMP Installation

  • Click the Start button windows-start-button-2003-2008.gif
  • Select "Control Panel"
  • Select "Programs and Features"
  • Click on "Add/Remove Windows Components":
    add-remove-programs-2003.gif
  • Once the "Windows Components Wizard" window opens, scroll the list and highlight "Management and Monitoring Tools" and click the "Details" button:
Management-and-Monitoring-Tools-select.gif
  • The "Management and Monitoring Tools" window will open. Check the box for "Simple Network Management Protocol".
  • Click OK.
  • On the "Windows Components Wizard" window, click "Next" and SNMP will be installed.
  • The SNMP Service will start automatically: Includes agents that monitor the activity in network devices and report to the network console workstation.
  • Continue with the Configuration Section


Windows Vista/7 SNMP Installation

  • Click the Start button windows-start-button.gif
  • Select "Control Panel"
  • Select "Programs and Features"
  • Click on "Turn Windows features on or off":
    programs-and-features-7.gif
  • In the "Windows Features" window, check the option for "Simple Network Management Protocol (SNMP)"
  • Click OK
  • Upon successful completion, the SNMP Service will start automatically: Includes agents that monitor the activity in network devices and report to the network console workstation.
  • Continue with the Configuration Section


Windows XP SNMP Installation

  • Click the Start Button start_button.gif
  • Select "Control Panel"
  • Select "Add/Remove Programs"
  • Click on "Add/Remove Windows Components":
add-remove-button.gif
  • Once the "Windows Components Wizard" window opens, scroll the list and highlight "Management and Monitoring Tools" and click the "Details" button:
Management-and-Monitoring-Tools-select.gif
  • The "Management and Monitoring Tools" window will open. Check the box for "Simple Network Management Protocol".
  • Click OK.
  • On the "Windows Components Wizard" window, click "Next" and SNMP will be installed.
  • Upon successful completion, two SNMP services will start automatically:
  1. SNMP Service - Includes agents that monitor the activity in network devices and report to the network console workstation.
  2. SNMP Trap Service - Receives trap messages generated by local or remote SNMP agents and forwards the messages to SNMP management programs running on this computer.


Configure SNMP - All OS's

NOTE: the following screens may be slightly different, however the concept is the same.

Add the "Public" Community

  • Click the Start Button
  • Select "Control Panel"
  • Double-click "Adminstrative Tools"
  • Double-click "Services"
  • Find and Right-Click "SNMP Service"
  • Click "Properties" and the SNMP Service properties window will open
SNMP-Service-Properties.gif
  • Select the "Traps" tab.
  • Enter "public" in the "Community Name" field, and click on the "Add to List" button
SNMP-Service-Properties-Traps.gif


Configure Security

  • Select the "Security" tab.
SNMP-Service-Properties-Security.gif
  • Click the "Add" button, in the section "Accepted Community Names"
  • Select "READ ONLY" from the rights drop-down
  • Enter "public" in the "Community Name" field,
  • Click on the "Add" button


Firewall Port Settings

  • Ensure the default ports are open
  • SNMP uses the default UDP port 161 for general SNMP messages (WebWatchBot uses this to query SNMP on a remote machine)
  • SNMP uses the default UDP port 162 for SNMP trap messages (WebWatchBot may use this port if sending an SNMP Trap)
NOTE: You may need to reboot for the settings to take effect.

ที่มา:http://www.poorperformance.com/wiki/index.php?title=Install,_Enable_and_Configure_SNMP_on_Windows