


สอนวิธีการแชร์ไฟล์ Windows 7 , Windows 8.1 , Windows 10 แบบละเอียด
Advertisements
โดยบทความที่ผมจะเขียนนี้เป็นบทความที่เหมาะสมกับการแชร์ไฟล์ต่างๆสำหรับคอมพิวเตอร์ที่อยู่ในบ้านนะครับ ไม่เหมาะสมกับองค์กรนะครับ (ในองค์กรแนะนำให้ทำ File Sharing )
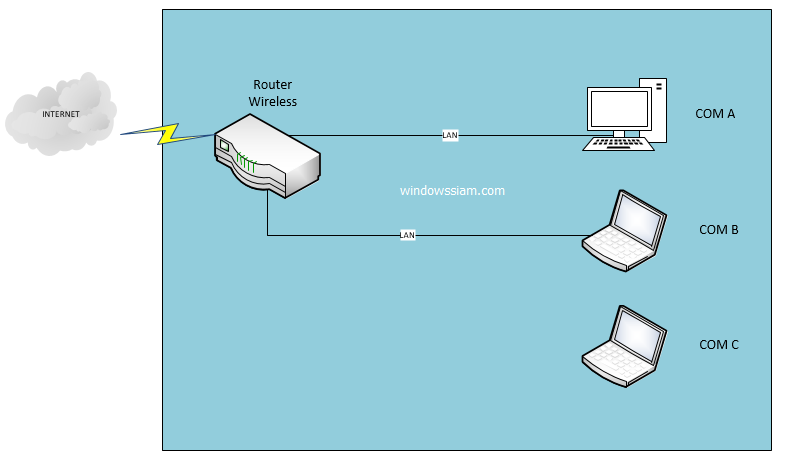
โดยส่วนมากในบ้านเราก็จะมี Router ที่เป็น Wireless + LAN ในตัว ก็คือสามารถใช้สายแลนเสียบก็ได้เหมาะกับ PC หรือจะใช้ Wireless ในการรับสัญญาณแบบไร้สาย อาจจะใช้กับ Notebook / iPad /iPhone
รูปแบบ Network ภายในบ้านที่นิยมใช้กันในปัจจุบัน
นิยาม
COM A (IP Address : 192.168.100.10)
COM B (IP Address : 192.168.100.11)
ในการเขียนบทความ ผมจะใช้ COM A เป็นเครื่องที่แชร์ไฟล์ โดยที่ COM B จะเข้ามาดึงไฟล์ใน COM A
สอนวิธีการแชร์ไฟล์ระหว่างคอมพิวเตอร์ Windows 7 , Windows 8 และ Windows 10
1. การแชร์ไฟล์ในส่วนนี้จะแยกของเป็นส่วนของแต่ละ Windows1.1 สำหรับ Windows 7
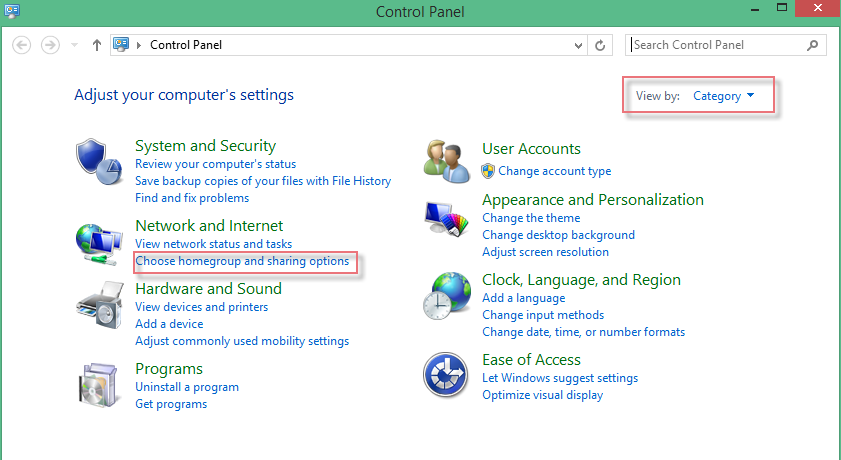
1.1.1 เข้า Control Panel > View by : Category
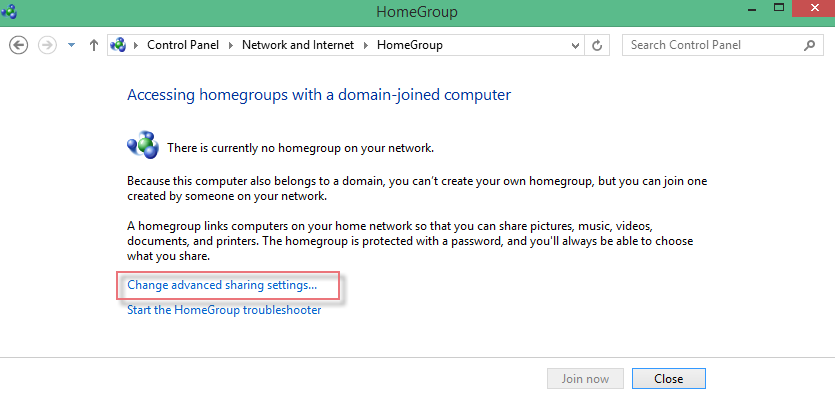
จากนั้นทำการคลิก Choose homegroup and sharing options
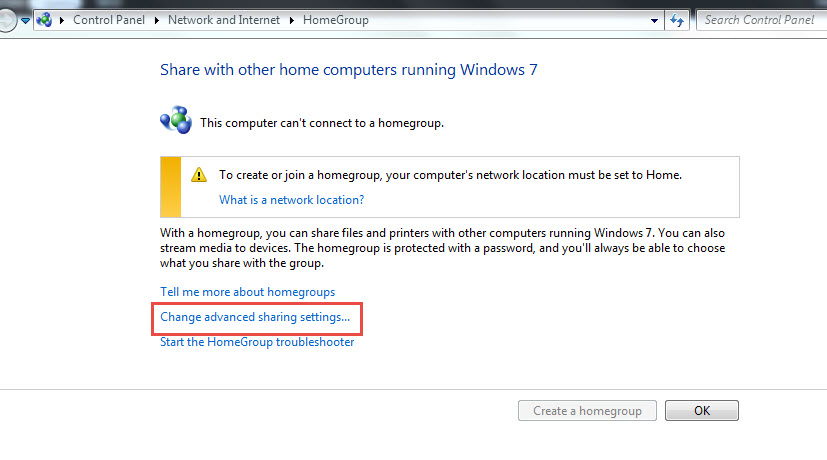
1.1.2 คลิก Change Advance Sharing settings
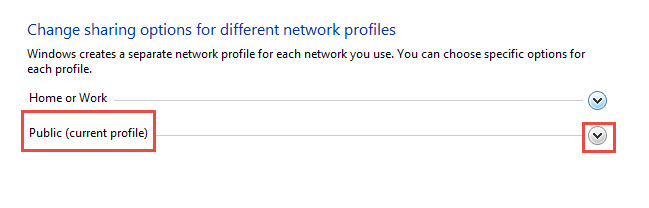
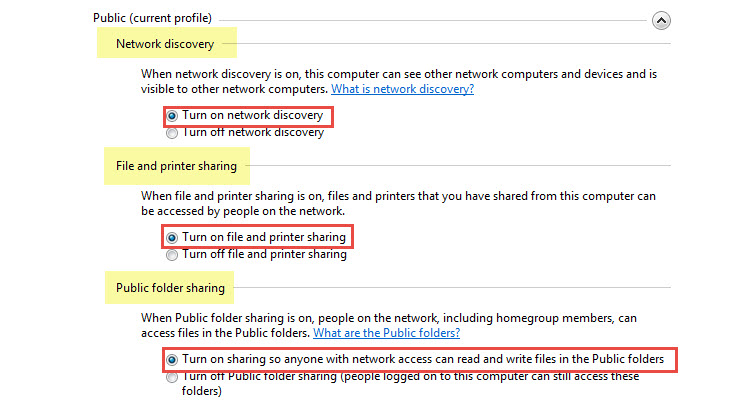
1.1.3 เลือก Public (Current Profile)
Network Discovery : Tune on
File and Printer sharing : Turn on
Publish folder sharing : Turn on
File Sharing Contentions : User 128-bit
Password Protected Sharing : ทำการเลือก Turn off password
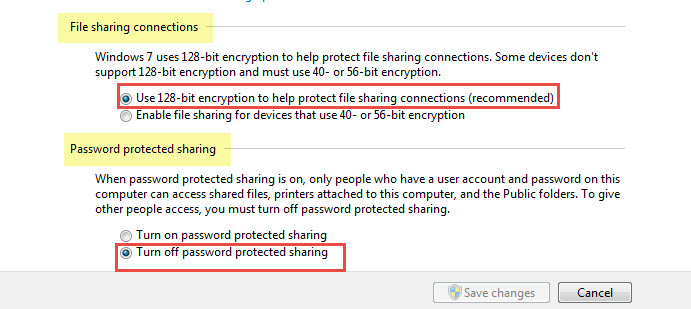
จากนั้นกด Save Changes
1.2 สำหรับ Windows 8.1
1.2.1 เข้า Control Panel > View by : Category
จากนั้นทำการคลิก Choose homegroup and sharing options
1.2.2 ทำการคลิก Change advanced sharing settings
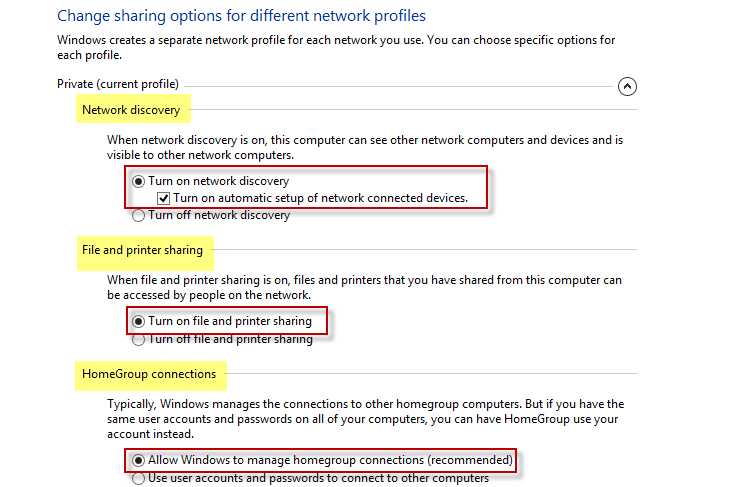
1.2.3 เลือก Private (Current Profile)
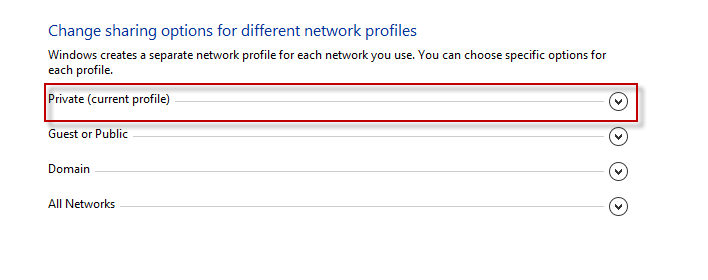
1.2.4 จากนั้นเลือกตามภาพ
Network Discovery : Turn on
File share Printer sharing : Turn on
Home Group : Allow Windows
1.3 สำหรับ Windows 10
1.3.1 เดี๋ยวอัพเดตให้ครับ (รอการเขียน)
Advertisements
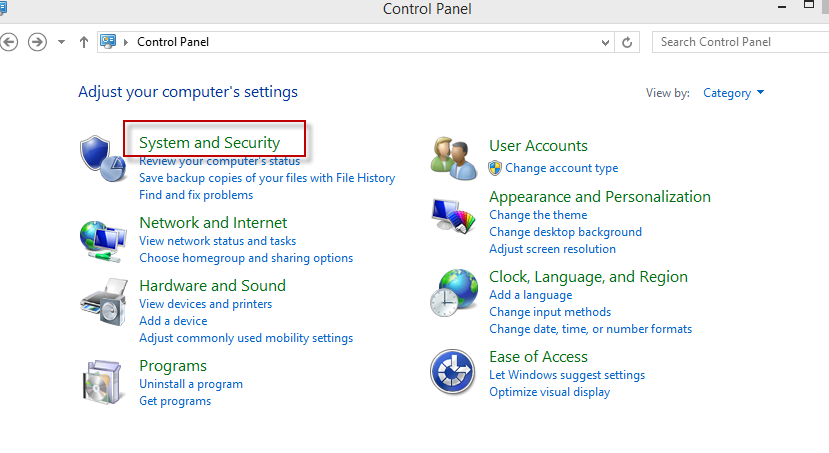
2. ขั้นตอนต่อไปคือการตรวจสอบ เรื่อง File and Printer Sharing ของ Firewall
โดยให้เข้า Control Panel : คลิก System and Security
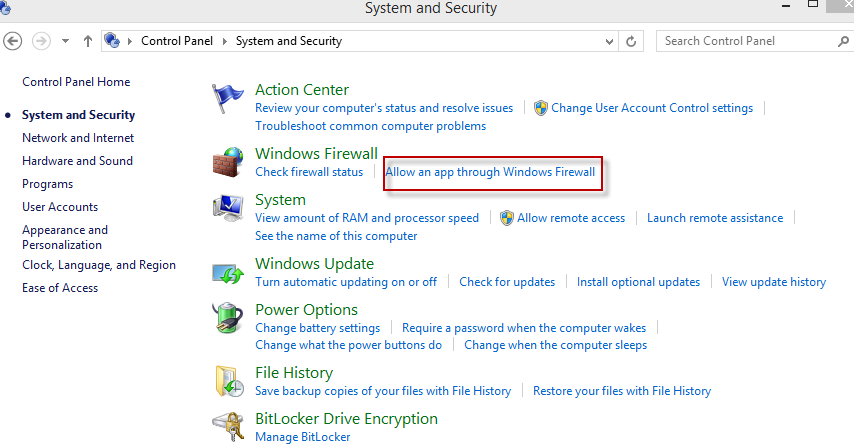
3. คลิก Allow an app though Windows Firewall
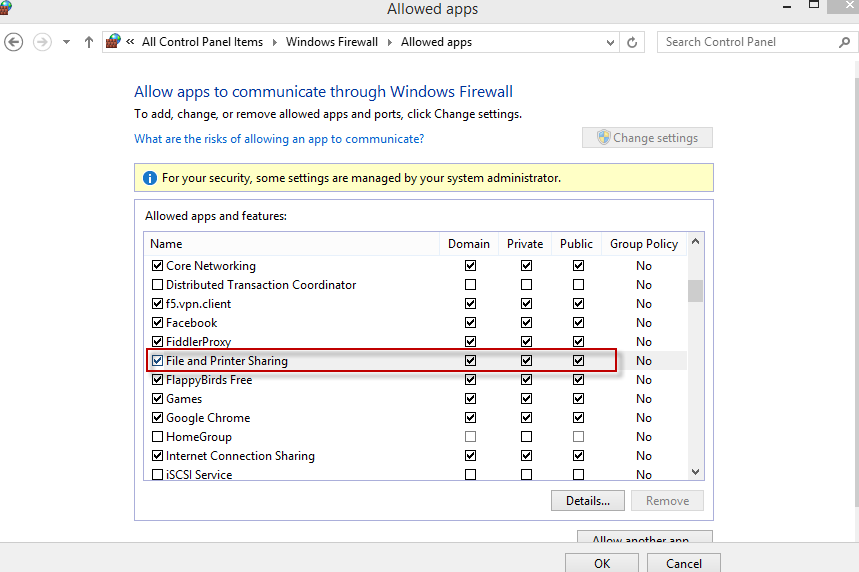
4. เลือก File and Printer Sharing : ให้ทำการติ๊กทั้งหมดของหัวข้อนี้ จากนั้นกด OK
5. สำหรับการทำการแชร์ไฟล์ระหว่างคอมพิวเตอร์นั้นๆ แนะนำว่า Computer ที่จะทำการแชร์ไฟล์กันนั้น จะต้องทำการ Ping กันได้ก่อนนะครับ โดยถ้าจะแชร์กันทั้ง 2 เครื่อง เครื่องทั้ง 2 ก็ต้อง ping หากันเจอทั้งคู่
โดยบทความนี้ผมจะไม่สอนวิธีการ Set IP Address นะครับ ส่วนวิธีการดู IP Address ของแต่ละบ้านก็แนะนำให้เปิด Command Prompt ขึ้นมาจากนั้นพิมพ์คำว่า ipconfig /all จากนั้นให้ดู IP และทำการ PING ให้ได้ โดยปกติ Router ที่บ้านแต่ละคนจะทำการแจก IP มาให้ไม่ซ้ำกันอยู่แล้วครับ
ขั้นตอนการเตรียมการแชร์ไฟล์ Windows
ตัวอย่าง ถ้าอยู่เครื่อง COM A ก็ให้ทำการใช้ command (ping IPปลายทาง)
ping 192.168.100.11 โดยถ้า ping จะ มีข้อความขึ้นมาว่า Reply to IP ที่เราทำการ ping นั้นเอง แต่ถ้าไม่ได้ก็จะขึ้น timeout
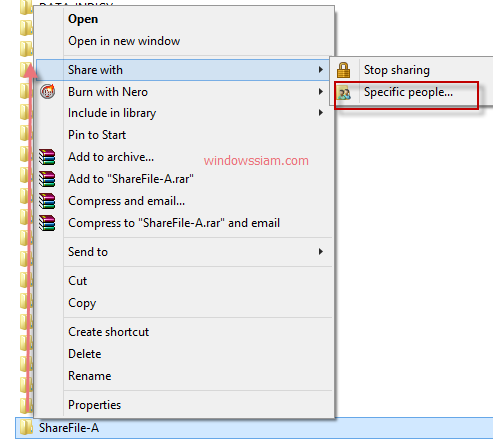
6. จากนั้นไปที่เครื่อง COM A (เครื่องที่จะแชร์ไฟล์)
คลิกขวาบน Folder หลักที่ต้องการแชร์ > เลือก Share With : Specific people
ในตัวอย่าง : เลือก Folder ShareFile-A ถ้าเราเลือก Folder นี้ (ถ้าข้างในมี Folder ย่อยๆ มันก็จะแชร์ให้หมดเลยครับ)
หมายเหตุ : ถ้าต้องการแชร์ไฟล์ทั้ง 2 เครื่อง ก็ให้ทำขั้นตอนที่ 6-9 ทั้ง 2 เครื่อง
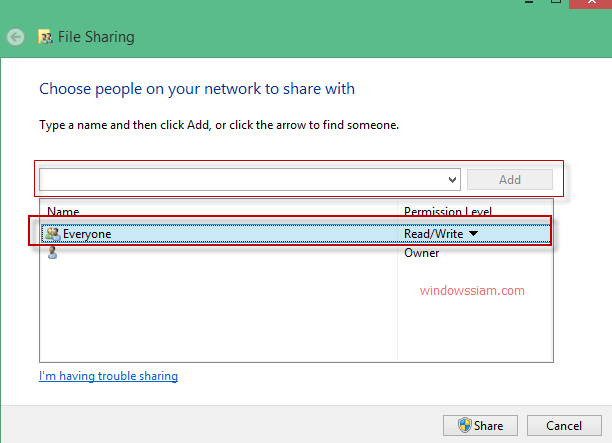
7. จากนั้นทำการพิมพ์ everyone ไปในช่องว่างและทำการกด Add
จากนั้นทำการเปลี่ยน Permission Level ให้เป็น Read / Write และทำการกด Share
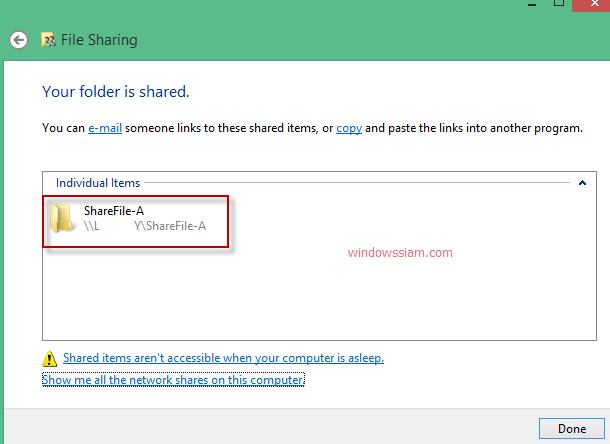
เมื่อทำการกดแชร์ เราก็จะเห็น Folder ที่เราทำการแชร์ จากนั้นกด Done
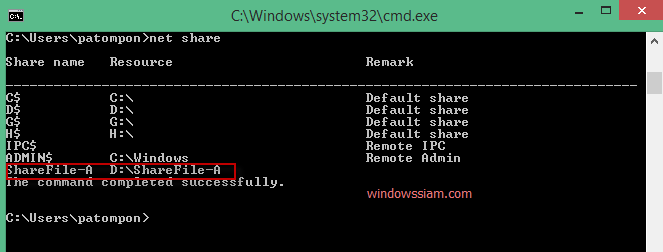
8. ทำการลองเปิด Command Prompt ขึ้นมาจากนั้นพิมพ์ net share และทำการ Enter
เราก็จะเห็น Folder ที่เราทำการคลิกขวาแชร์ไฟล์นั้นเอง
9. เมื่อเราทำการแชร์ File บนเครื่องคอมพิวเตอร์ COM A เสร็จเรียบร้อย
หลังจากนั้นก็ให้ไปที่ คอมพิวเตอร์ COM B จากนั้นให้พิมพ์ในช่อง ได้เลย
ให้ทำการพิมพ์ \\ชื่อเครื่องCOM A\Folder ที่แชร์
เช่น \\COMA\ShareFile-A จากนั้นกด Enter
COM B : จากนั้นเราก็จะเห็น Folder ต่างๆในคอมพิวเตอร์ A
เท่านี้ก็เสร็จสิ้นการแชร์ไฟล์ต่างๆสำหรับ Windows ภายในบ้านของเราแล้วครับ แต่ถ้าใครทำตามผมแล้วยังไม่ได้
ให้ตรวจสอบดังนี้ครับ
– ลองทำการปิด AntiVirus ชั่วคราวดูครับ เพราะบางเจ้า ทำการ Block ไว้อยู่
ที่มา: https://www.windowssiam.com/share-file-windows-7-windows8-1-windows10/
 This option is the same as


