phpVirtualBox is an open source web interface for Oracle VirtualBox,
written in php with AJAX implementation. It allows you to remotely
manage VirtualBox instance, really useful when you don’t have GUI in
operating system. phpVirtualBox allows you control and manage guest
instance as like the VirtualBox GUI do, you wont find any difference
between the web interface and VirtualBox GUI. More to that phpVirtualBox
supports remote console via Oracle RDP web client that comes with
Extension Pack.
Here is the small guide to setup phpVirtualBox on Ubuntu (Its
supports all Linux Variants, its minimum requirement is to have the web
server installed with PHP support).
We need to modify the phpVirtualBox configuration to make the
successful communication with VirtualBox installation, first we need to
rename sample config file (config.php-example to config.php).
Following are the minimum configuration for phpVirtualBox. User Name /
Password for the system that runs VirtualBox, in my case i am using
user “raj”, because he will be configured to run vboxwebsrv service(
will be set in next step).
var $username = ‘raj’;
var $password = ‘x’;
If you are running VirtualBox and php are on the same host, leave the following $location as it is.
var $location = ‘http://127.0.0.1:18083/’;
Configure vboxweb-service:
VirtualBox setup creates init script vboxweb-service when it is
installed, this is used to start and stop the vboxwebserv, before
starting the service, we need to have /etc/default/virtualbox file
because it contains settings for the service . We need to create it
manually if it does not exists.
sodo nano /etc/default/virtualbox
We must set minimum VBOXWEB_USER to run the vboxweb-service, now
VirtualBox will run as “raj”; this user and password must be entered in
phpVirtualBox config file.
VBOXWEB_USER=raj
If you are running phpVirtualBox in some other host, VBOXWEB_HOST is
need to be set in the same file, in this case phpVirtualBox will
communicate with vboxweb-service over the network.
VBOXWEB_USER=raj

VBOXWEB_HOST=192.168.1.103
Restart the vboxweb-service.
sudo /etc/init.d/vboxweb-service restart
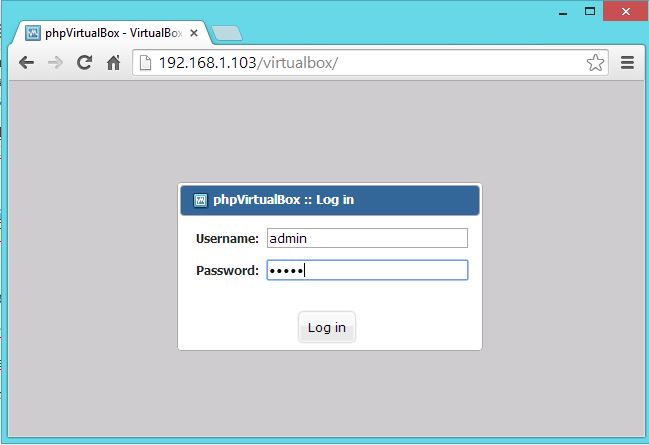
Now open a web browser and point to http://your-ip-address/virtualbox, you will be asked to login. Default login is admin /admin. phpVirtualBox – Login Page
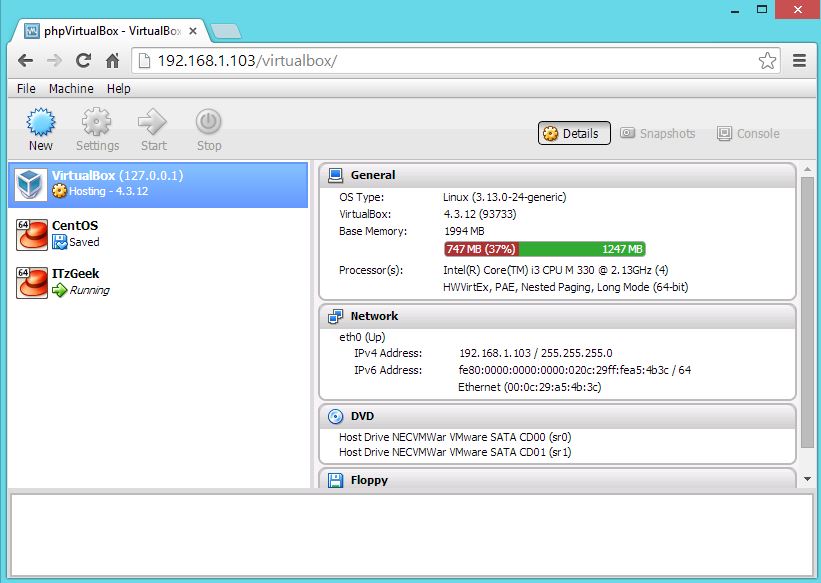
You can find the created vm’s. You can either create a new vm or work on existing vms by taking console. phpVirtualBox – Home Page
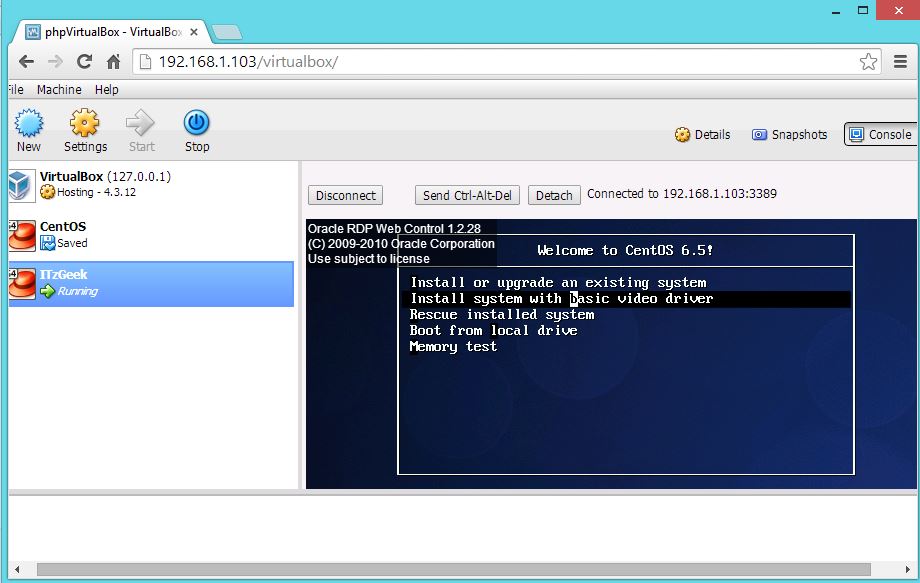
To take a remote console you must install VirtualBox Extension Pack and also you have to Enable Remote Console.
You can take console by clicking console tab in browser. phpVirtualBox – WebRDP Console
OR
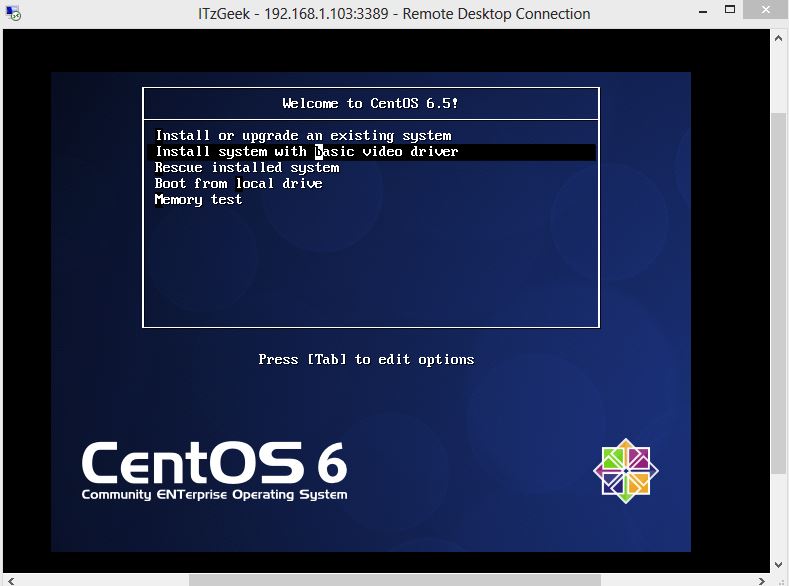
Take mstsc of host server where VirtualBox is running. phpVirtualBox – RDP Console
That’s All. We welcome your comments, please do comment in comments section.
หลายคนมีคอมพิวเตอร์อยู่ในบ้าน หลายเครื่อง ทั้ง Notebook ของพ่อ , PC
ของลูก และคอมพิวเตอร์อื่นๆอีกมากมาย โดยแต่ละเครื่องก็จะลง Windows
แตกต่างๆกันไป อาทิเช่น Windows 7 , Windows 8.1 หรือ Windows 10
แต่วันนี้ผมจะมาสอนวิธีการแชร์ไฟล์ต่างๆระหว่างคอมพิวเตอร์ – คอมพิวเตอร์ เพื่อให้สามารถทำการเข้าไปดึงไฟล์ต่างๆข้ามเครื่องกันได้ โดยอาจจะเป็นเครื่องหลักเครื่องหนึ่งในการเข้ามาดึงไฟล์
หรือจะแชร์ไฟล์กันทั้ง 2 เครื่องไขว้กันมาก็ได้ แล้วแต่ละบ้านที่จะทำ
โดยมือใหม่ที่จะทำการหัดแชร์ไฟล์ใน Windows อาจจะงงๆกับการแชร์ไฟล์
แต่ถ้าหลังจากที่อ่านบทความผมคุณก็สามารถทำการแชร์ไฟล์ได้อย่างง่ายดาย
โดยบทความที่ผมจะเขียนนี้เป็นบทความที่เหมาะสมกับการแชร์ไฟล์ต่างๆสำหรับคอมพิวเตอร์ที่อยู่ในบ้านนะครับ
ไม่เหมาะสมกับองค์กรนะครับ (ในองค์กรแนะนำให้ทำ File Sharing )
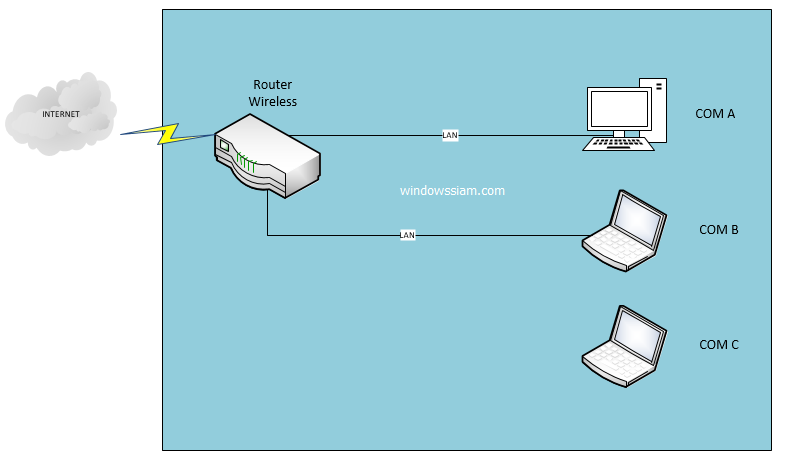
โดยส่วนมากในบ้านเราก็จะมี Router ที่เป็น Wireless + LAN ในตัว
ก็คือสามารถใช้สายแลนเสียบก็ได้เหมาะกับ PC หรือจะใช้ Wireless
ในการรับสัญญาณแบบไร้สาย อาจจะใช้กับ Notebook / iPad /iPhone รูปแบบ Network ภายในบ้านที่นิยมใช้กันในปัจจุบัน นิยาม
COM A (IP Address : 192.168.100.10)
COM B (IP Address : 192.168.100.11)
ในการเขียนบทความ ผมจะใช้ COM A เป็นเครื่องที่แชร์ไฟล์ โดยที่ COM B จะเข้ามาดึงไฟล์ใน COM A
สอนวิธีการแชร์ไฟล์ระหว่างคอมพิวเตอร์ Windows 7 , Windows 8 และ Windows 10
1. การแชร์ไฟล์ในส่วนนี้จะแยกของเป็นส่วนของแต่ละ Windows 1.1 สำหรับ Windows 7
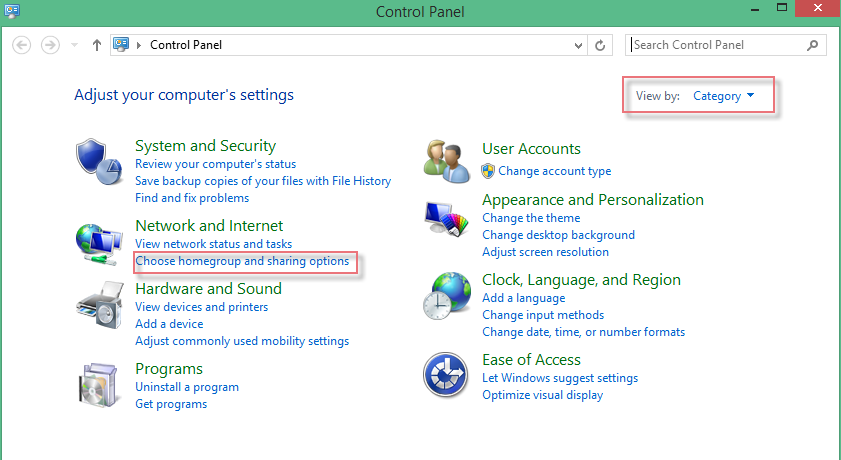
1.1.1 เข้า Control Panel > View by : Category
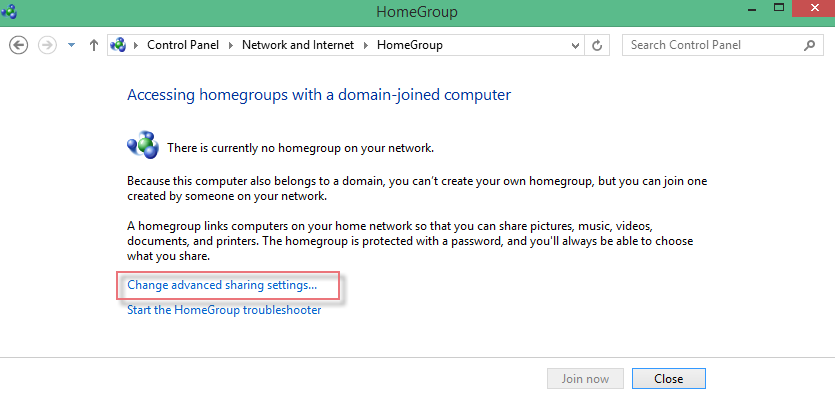
จากนั้นทำการคลิก Choose homegroup and sharing options
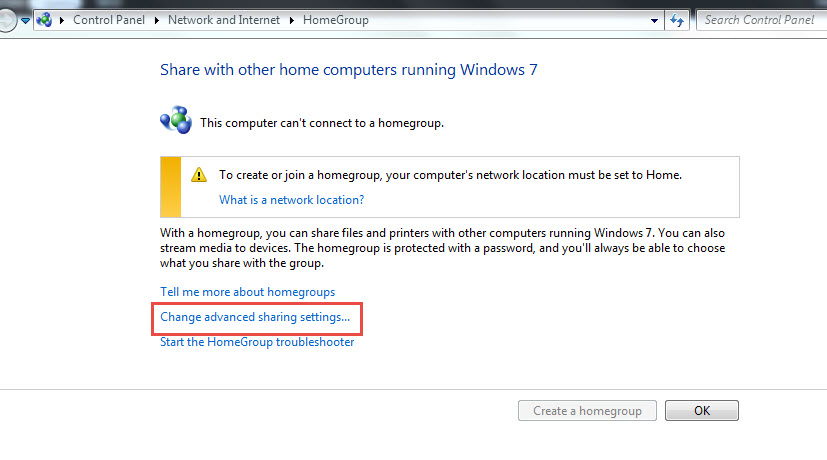
1.1.2 คลิก Change Advance Sharing settings
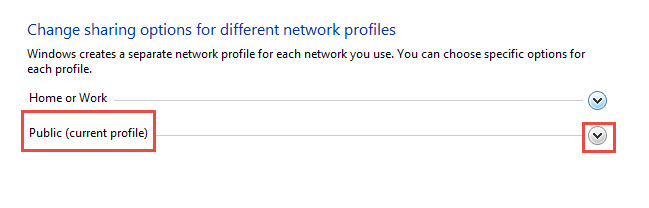
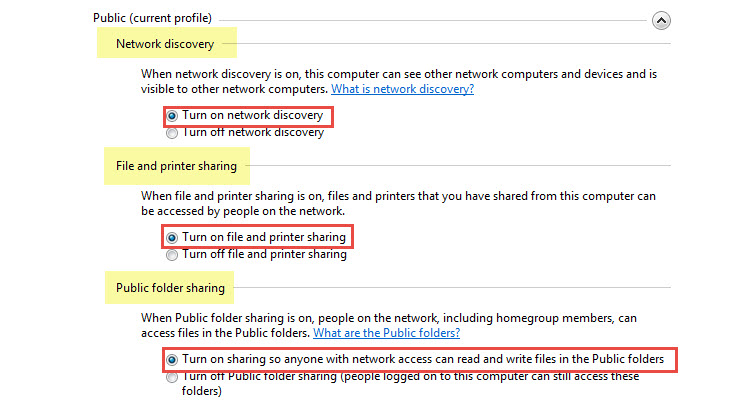
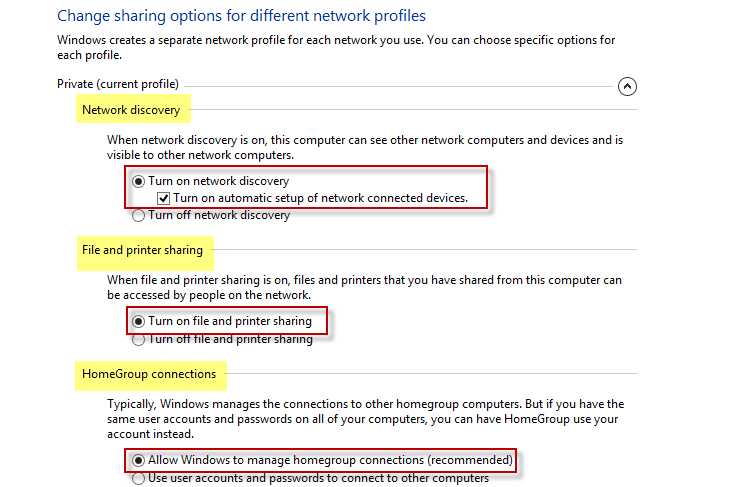
1.1.3 เลือก Public (Current Profile)
Network Discovery : Tune on
File and Printer sharing : Turn on
Publish folder sharing : Turn on
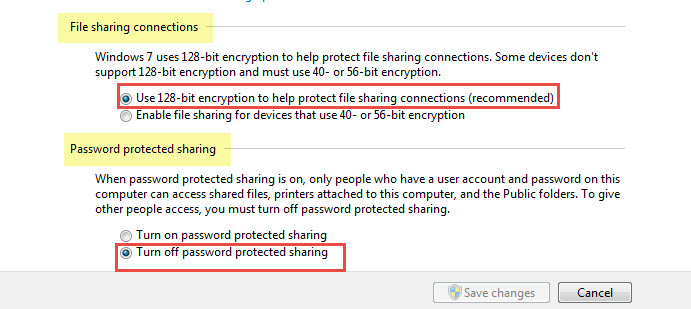
File Sharing Contentions : User 128-bit
Password Protected Sharing : ทำการเลือก Turn off password
จากนั้นกด Save Changes 1.2 สำหรับ Windows 8.1
1.2.1 เข้า Control Panel > View by : Category
จากนั้นทำการคลิก Choose homegroup and sharing options
1.2.2 ทำการคลิก Change advanced sharing settings
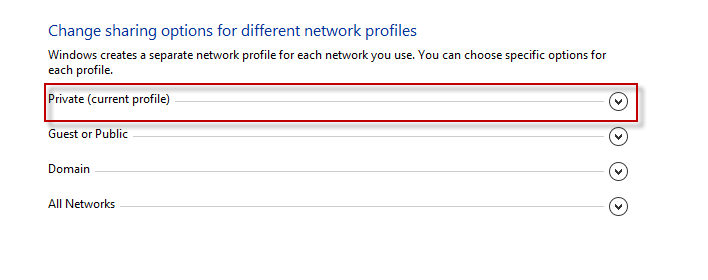
1.2.3 เลือก Private (Current Profile)
1.2.4 จากนั้นเลือกตามภาพ
Network Discovery : Turn on
File share Printer sharing : Turn on
Home Group : Allow Windows
1.3 สำหรับ Windows 10
1.3.1 เดี๋ยวอัพเดตให้ครับ (รอการเขียน)
Advertisements
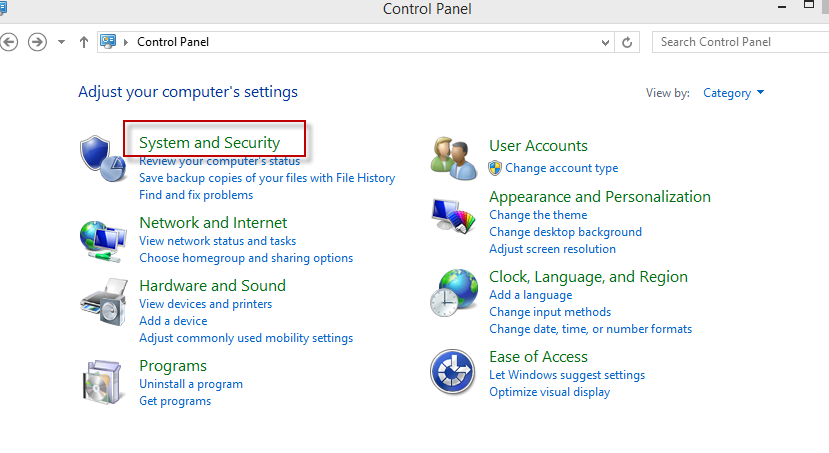
2. ขั้นตอนต่อไปคือการตรวจสอบ เรื่อง File and Printer Sharing ของ Firewall
โดยให้เข้า Control Panel : คลิก System and Security
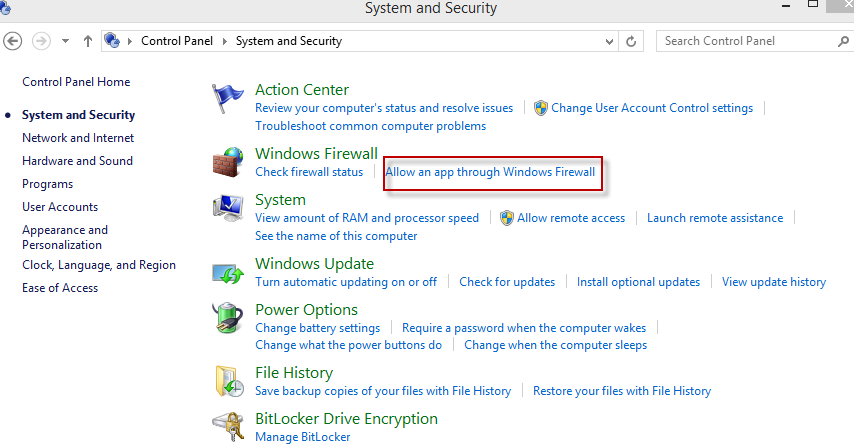
3. คลิก Allow an app though Windows Firewall
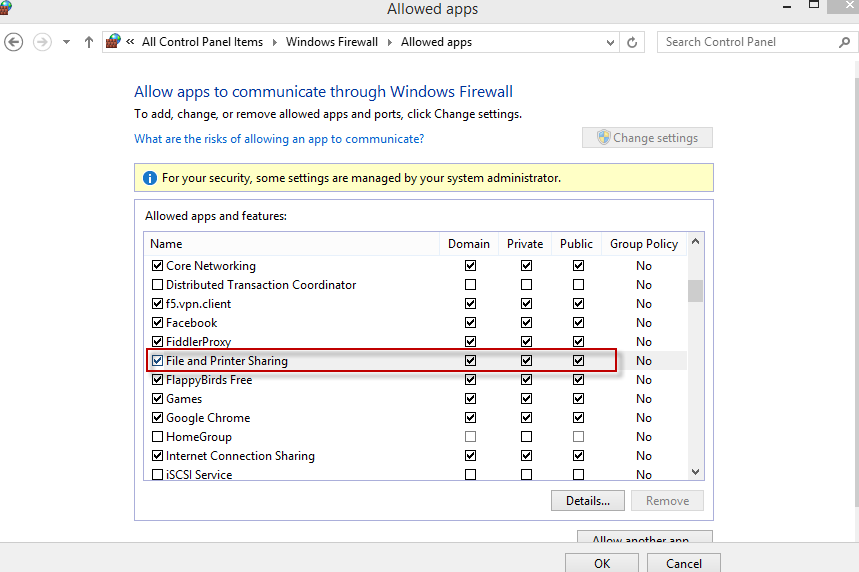
4. เลือก File and Printer Sharing : ให้ทำการติ๊กทั้งหมดของหัวข้อนี้ จากนั้นกด OK
5. สำหรับการทำการแชร์ไฟล์ระหว่างคอมพิวเตอร์นั้นๆ แนะนำว่า Computer
ที่จะทำการแชร์ไฟล์กันนั้น จะต้องทำการ Ping กันได้ก่อนนะครับ
โดยถ้าจะแชร์กันทั้ง 2 เครื่อง เครื่องทั้ง 2 ก็ต้อง ping หากันเจอทั้งคู่
โดยบทความนี้ผมจะไม่สอนวิธีการ Set IP Address นะครับ ส่วนวิธีการดู IP
Address ของแต่ละบ้านก็แนะนำให้เปิด Command Prompt
ขึ้นมาจากนั้นพิมพ์คำว่า ipconfig /all จากนั้นให้ดู IP และทำการ PING ให้ได้ โดยปกติ Router ที่บ้านแต่ละคนจะทำการแจก IP มาให้ไม่ซ้ำกันอยู่แล้วครับ
ขั้นตอนการเตรียมการแชร์ไฟล์ Windows ตัวอย่าง ถ้าอยู่เครื่อง COM A ก็ให้ทำการใช้ command (ping IPปลายทาง)
ping 192.168.100.11 โดยถ้า ping จะ มีข้อความขึ้นมาว่า Reply to IP ที่เราทำการ ping นั้นเอง แต่ถ้าไม่ได้ก็จะขึ้น timeout
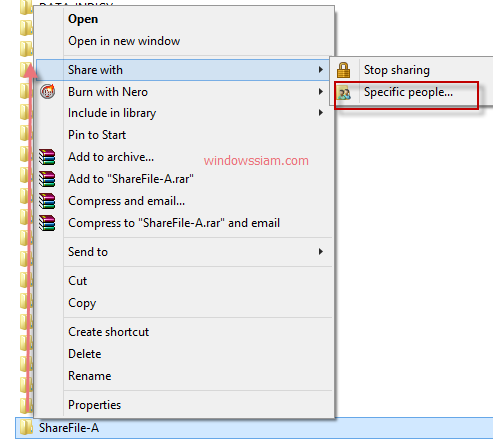
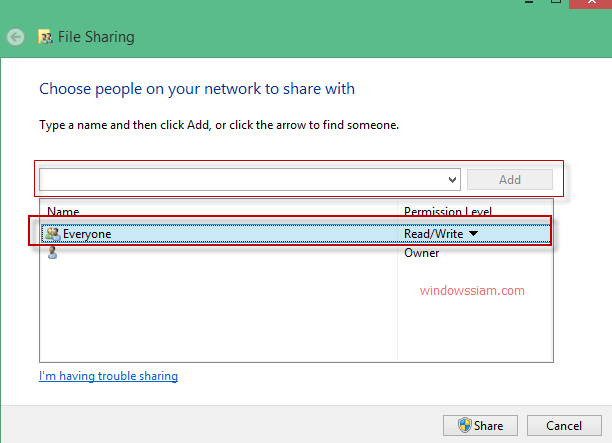
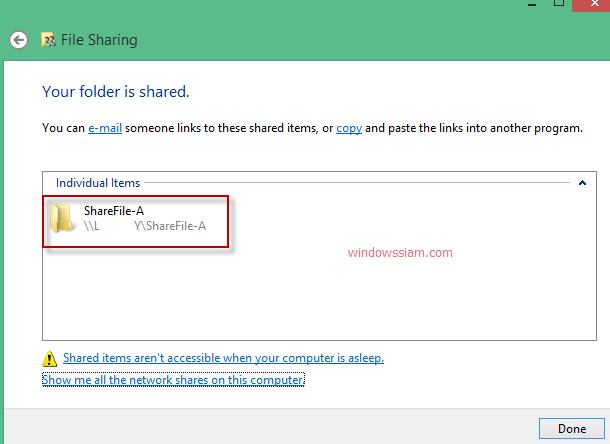
6. จากนั้นไปที่เครื่อง COM A (เครื่องที่จะแชร์ไฟล์)
คลิกขวาบน Folder หลักที่ต้องการแชร์ > เลือก Share With : Specific people ในตัวอย่าง : เลือก Folder ShareFile-A ถ้าเราเลือก Folder นี้ (ถ้าข้างในมี Folder ย่อยๆ มันก็จะแชร์ให้หมดเลยครับ)
หมายเหตุ : ถ้าต้องการแชร์ไฟล์ทั้ง 2 เครื่อง ก็ให้ทำขั้นตอนที่ 6-9 ทั้ง 2 เครื่อง
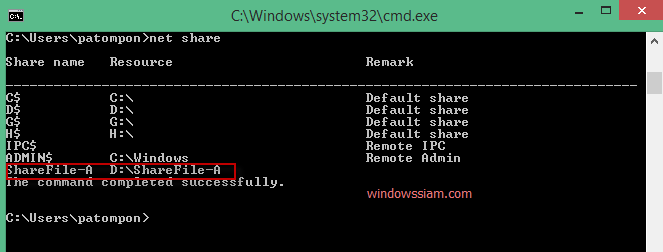
8. ทำการลองเปิด Command Prompt ขึ้นมาจากนั้นพิมพ์ net share และทำการ Enter
เราก็จะเห็น Folder ที่เราทำการคลิกขวาแชร์ไฟล์นั้นเอง
9. เมื่อเราทำการแชร์ File บนเครื่องคอมพิวเตอร์ COM A เสร็จเรียบร้อย
หลังจากนั้นก็ให้ไปที่ คอมพิวเตอร์ COM B จากนั้นให้พิมพ์ในช่อง ได้เลย
ให้ทำการพิมพ์ \\ชื่อเครื่องCOM A\Folder ที่แชร์
เช่น \\COMA\ShareFile-A จากนั้นกด Enter
COM B : จากนั้นเราก็จะเห็น Folder ต่างๆในคอมพิวเตอร์ A
วิธีการเปิดหรือปิดการป้องกันแบบเรียลไทม์ของ Windows Defender ใน Windows 10
Windows
Defender ช่วยปกป้องคอมพิวเตอร์ของคุณจากมัลแวร์
(ซอฟต์แวร์ที่เป็นอันตราย)
เช่นไวรัสสปายแวร์และซอฟต์แวร์ที่ไม่พึงประสงค์อื่น ๆ มัลแวร์สามารถติดตั้งเครื่องคอมพิวเตอร์ของคุณโดยที่คุณไม่รู้ตัวอาจติดตั้งตัวเองจากข้อความอีเมลเมื่อคุณเชื่อมต่อกับอินเทอร์เน็ตหรือเมื่อคุณติดตั้งแอปพลิเคชันบางอย่างโดยใช้แฟลชไดรฟ์
USB ซีดีหรือดีวีดีหรือสื่อบันทึกข้อมูลแบบถอดได้อื่น ๆ มัลแวร์บางตัวสามารถตั้งโปรแกรมให้ทำงานได้ในเวลาที่ไม่คาดคิดไม่ใช่เฉพาะเมื่อติดตั้งเท่านั้น Windows Defender มาพร้อมกับ Windows และช่วยป้องกันไม่ให้มัลแวร์ติดไวรัสพีซีของคุณได้สองวิธี:
ให้การป้องกันแบบเรียลไทม์ Windows Defender แจ้งเตือนคุณเมื่อมัลแวร์พยายามติดตั้งเองหรือเรียกใช้งานบนเครื่องพีซีของคุณ นอกจากนี้ยังแจ้งให้คุณทราบเมื่อแอปพยายามเปลี่ยนการตั้งค่าที่สำคัญ ให้ตัวเลือกการสแกนได้ตลอดเวลา Windows
Defender
จะสแกนคอมพิวเตอร์ของคุณโดยอัตโนมัติเพื่อหามัลแวร์ที่ติดตั้งอยู่เป็นประจำ
แต่คุณสามารถเริ่มสแกนได้ทุกเมื่อที่ต้องการ Windows Defender จะลบข้อมูลที่ตรวจพบระหว่างการสแกนโดยอัตโนมัติ (หรือกักกันชั่วคราว)
To Enable or Disable Windows Defender Real-time Protection using a REG file
This option is the same as Option Five
above and will let you disable Windows Defender Real-time Protection
without being prompted it is turned off, and without it getting
automatically turned back on later by Windows.
    DocumentRoot c:/xampp/htdocs
    ServerName localhost

        Options Indexes FollowSymLinks Includes ExecCGI
        AllowOverride All
        Order Deny,Allow
        Allow from all
ต่อมาทำการเพิ่มชื่อ Domain Name หรือ Host Name เพื่ออ้างอิงไปยัง Path ที่เก็บเว็บไซต์ที่ต้องการและกำหนดสิทธิ์การเข้าถึง
    DocumentRoot c:/xampp/htdocs/share/public
    ServerName share.olanlab.com

        Options Indexes FollowSymLinks Includes ExecCGI
        AllowOverride All
        Order Deny,Allow
        Allow from all
ตัวอย่างด้านบน
Path ที่เก็บเว็บไซต์เป็น - c:/xamp/htdocs/share/public
Domain Name เป็น - share.olanlab.com
ขั้นตอนที่ 2 แก้ไข hosts
ไปที่ C:\Windows\System32\drivers\etc\hosts เปิดไฟล์ขึ้นมาทำการเพิ่ม
Host Name และ IP Address เพื่อให้เครื่องของเรารู้จักชื่อ Host Name
นี้ว่าจะต้องไปที่ IP Adress อะไร
127.0.0.1       localhost
127.0.0.1       share.olanlab.com
*ไฟล์ hosts ทำหน้าที่เก็บข้อมูล Host Name กับ IP Address ที่ตรงกัน


 This option is the same as Option Five
above and will let you disable Windows Defender Real-time Protection
without being prompted it is turned off, and without it getting
automatically turned back on later by Windows.
This option is the same as Option Five
above and will let you disable Windows Defender Real-time Protection
without being prompted it is turned off, and without it getting
automatically turned back on later by Windows.


